
微信小程序scroll-view实现左右联动上下滚动效果源码
作者:xlnxin发布时间:2026-03-04分类:编程知识浏览:280
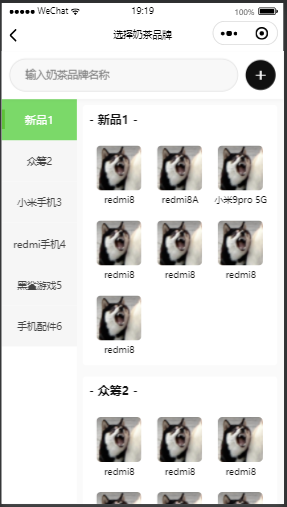
导读:点击左边的按钮时,右边可以跳动到指定的位置,滚动右边,左边菜单跳到相应的位置
微信小程序点击左边的按钮时,右边可以跳动到指定的位置,滚动右边,左边菜单跳到相应的位置。
小程序js源码
//index.js
//获取应用实例
const app = getApp()

Page({
  data: {
    toView: 'a1',
    activeId: 'a1',
    category: [
      {name: '新品', id: 'a1'},
      { name: '众筹', id: 'a2' },
      { name: '小米手机', id: 'a3' },
      { name: 'redmi手机', id: 'a4' },
      { name: '黑鲨游戏', id: 'a5' },
      { name: "手机配件", id: 'a6' },
      { name: '电视', id: 'a7'},
      { name: '电脑', id: 'a8' },
    ],
    content: [
      {
        title: '- 新品 -',
        options: [
          { src: '../../image/redmi.png',id: '001',text: 'redmi8'},
          { src: '../../image/redmi.png', id: '002', text: 'redmi8A' },
          { src: '../../image/redmi.png', id: '003', text: '小米9pro 5G'},
          { src: '../../image/redmi.png', id: '004', text: 'redmi8'},
          { src: '../../image/redmi.png', id: '005',text: 'redmi8' }
        ],
        id: 'a1'
      },
      {
        title: '- 众筹 -',
        options: [
          { src: '../../image/zhongchou.png', id: '006', text: 'redmi8' },
          { src: '../../image/zhongchou.png', id: '007' ,text: 'redmi8'},
          { src: '../../image/zhongchou.png', id: '008', text: 'redmi8' },
          { src: '../../image/zhongchou.png', id: '009',text: 'redmi8' }
        ],
        id: 'a2'
      },
      {
        title: '- 小米手机 -',
        options: [
          { src: '../../image/xiaomi.png', id: '006', text: 'redmi8' },
          { src: '../../image/xiaomi.png', id: '007', text: 'redmi8' },
          { src: '../../image/xiaomi.png', id: '008', text: 'redmi8' },
          { src: '../../image/xiaomi.png', id: '009', text: 'redmi8' }
        ],
         id: 'a3'
      },
      {
        title: '- redmi手机 -',
        options: [
          { src: '../../image/hongmi.png', id: '006', text: 'redmi8' },
          { src: '../../image/hongmi.png', id: '007', text: 'redmi8' },
          { src: '../../image/hongmi.png', id: '008', text: 'redmi8' },
          { src: '../../image/hongmi.png', id: '009', text: 'redmi8' }
        ],
        id: 'a4'
      },
      {
        title: '- redmi手机 5-',
        options: [
          { src: '../../image/hongmi.png', id: '006', text: 'redmi8' },
          { src: '../../image/hongmi.png', id: '007', text: 'redmi8' },
          { src: '../../image/hongmi.png', id: '008', text: 'redmi8' },
          { src: '../../image/hongmi.png', id: '009', text: 'redmi8' }
        ],
        id: 'a5'
      },
      {
        title: '- redmi手机6 -',
        options: [
          { src: '../../image/hongmi.png', id: '006', text: 'redmi8' },
          { src: '../../image/hongmi.png', id: '007', text: 'redmi8' },
          { src: '../../image/hongmi.png', id: '008', text: 'redmi8' },
          { src: '../../image/hongmi.png', id: '009', text: 'redmi8' }
        ],
        id: 'a6'
      },
      {
        title: '- redmi手机 7-',
        options: [
          { src: '../../image/hongmi.png', id: '006', text: 'redmi8' },
          { src: '../../image/hongmi.png', id: '007', text: 'redmi8' },
          { src: '../../image/hongmi.png', id: '008', text: 'redmi8' },
          { src: '../../image/hongmi.png', id: '009', text: 'redmi8' }
        ],
        id: 'a7'
      }

    ],
  },
  //事件处理函数
  onLoad: function () {
    this.setData({
      toView: 'a1',
      heightArr: []
    })
    let query = wx.createSelectorQuery();
    query.selectAll('.catefory-main').boundingClientRect((rect)=> {
      rect.forEach(ele => {
        this.calculateHeight(ele.height);
      })
    }).exec();
  },
  clickItem(e) {
    this.setData({
      activeId: e.currentTarget.dataset.id,
      toView: e.currentTarget.dataset.id
    })
    console.log(this.data.toView)
  },
  scroll(e) {
    let scrollHeight = e.detail.scrollTop;
    let index = this.calculateIndex(this.data.heightArr,scrollHeight);
    this.setData({
      activeId: 'a'+index
    })

  },
  // 计算滚动的区间
  calculateHeight(height) {
    let heightArr = this.data.heightArr; // 获取高度数组
    let heightLen = heightArr.length; // 获取高度数组的长度
    if (heightLen == 0) { // 如果高度数组的长度为0
      heightArr.push(height); // 直接添加进去第一个高度
    } else { // 如果高度数组的长度不为0
      heightArr.push(height + heightArr[heightLen - 1]); // 将当前高度与前一个高度相加
    }
    this.setData({ // 设置高度数组
      heightArr: heightArr,
    });
  },
  // 计算左边选中的下标
  calculateIndex(arr, scrollHeight) {
    let index= '';
    for(let i =0;i<arr.length;i++) {
      if (scrollHeight >= 0 && scrollHeight < arr[0]){
        index = 0;
      }else if(scrollHeight >= arr[i-1] && scrollHeight < arr[i]){
        index = i;
      }
    }
    return index+1;
  }
})
wxml源码
<view class="container">
  <view class="category-left">
    <scroll-view scroll-y="true" style="height:100%">
      <block wx:for="{{category}}" wx:key="id">
       <view class="catgegory-item {{activeId === item.id?'active-item':''}}" data-id="{{item.id}}" bindtap="clickItem">{{item.name}}</view>
      </block>
    </scroll-view>
  </view>
  <view class="category-right">
    <scroll-view scroll-y="true" style="height:100%" scroll-into-view="{{toView}}" scroll-with-animation="ture" bindscroll="scroll">
      <view class="categoty-detail">
      <block wx:for="{{content}}" wx:key="id">
        <view class="catefory-main">
          <view class="category-title" id="{{item.id}}">{{item.title}}</view>
          <view class="category-content">
              <view class="content-item" wx:for="{{item.options}}" wx:for-item="i" wx:key="id">
                <image src="https://mmbiz.qpic.cn/sz_mmbiz_jpg/IhB6Hhm1o7faWcDyQ9OHREZicedE7eXG4LnmSiafMibNCHRicsoFO9MEwZdsparF10DIpVSTWNbQaOpR2p7QAA4cqQ/640?wx_fmt=jpeg&from=appmsg&tp=webp&wxfrom=5&wx_lazy=1#imgIndex=7"></image>

              </view>
          </view>
        </view>
      </block>
      </view>
    </scroll-view>
  </view>
</view>
wxss源码
/**index.wxss**/
.container {
  padding: 0;
  width:100%;
  height: 100vh;
  display: flex;
  flex-direction: row;
  align-items: flex-start;
}
.category-left {
  height: 100%;
  width: 22%;
  padding: 0 20rpx;
  box-sizing: border-box;
  border-right: 1px solid #efefef;
}
.catgegory-item {
  padding: 20rpx 0;
  font-size: 30rpx;
  text-align:  center;
}
.active-item {
  color: orange;
}
.category-right {
  flex:1;
  height: 100%;
}
.category-content {
  display: grid;
  grid-template-columns: repeat(auto-fill, 390rpx);
}
.category-title {
  text-align: center;
}
.content-item {
  display: flex;
  flex-direction: column;
  padding: 20rpx;
  text-align: center;
  font-size: 30rpx;
}
.content-item image{
  width: 320rpx;
  height: 320rpx;
}
- 编程知识排行
-
- 1微信小程序弹出对话框输入名字
- 2宝塔面板phpMyAdmin提示:服务器和客户端上指示的HTTPS之间不匹配
- 3微信小程序input组件解决iphone拼音字符maxlength长度问题
- 4微信小程序页面跳转:wx.switchTab、wx.reLaunch、wx.redirectTo、wx.navigateTo、wx.navigateBack”的使用区别介绍
- 5小程序默认icon
- 6微信小程序image组件中aspectFill和widthfix、scaleToFill对比
- 7宝塔面板文件管理器文件不能排序解决方法
- 8宝塔面板PHP-5.6.40中phpmyadmin不能快捷打开数据库
- 9微信小程序button如何去掉边框设置透明
- 最近发表